Chapter 6: Classroom Habits + Study Strategies
Show up to class to show up for yourself
In order to reach your academic goals, meet your expectations, and make progress towards the completion of your degree, you have to do work. Sometimes this work may feel like you are jumping through the hoops that professors or your program created. It may feel like jumping through some hoops is redundant, or it’s a struggle to jump through the hoop. The learning experience and problems you face while working towards your academic goals can be difficult. College is where you expand your mind and thinking skills. Part of the expansion is not the technical information you learn in class, but how to manage yourself and manage the struggle.
This chapter can help you get through some of the hurdles you may face in order for you to be able to surpass your goals and expectations.
Learning Objectives
This chapter will:
- Get an understanding of why we take notes
- Identify and evaluate the note-taking methods/systems
- Learn about active reading strategies
- Learn how to read different texts
Classroom Habits
Note-Taking Systems, Methods and Study Guides
The following is a chart with a brief explanation of the main note-taking systems that are described in more depth later in this chapter.
|
Method |
Description |
When to Use |
|
Lists |
A sequential listing of ideas as they are presented. Lists may be short phrases or complete paragraphs describing ideas in more detail. |
This method is what most students use as a fallback if they haven’t learned other methods. This method typically requires a lot of writing, and you may find that you are not keeping up with the professor. It is not easy for students to prioritize ideas in this method. |
|
The list method is usually not the best choice because it is focused exclusively on capturing as much of what the instructor says as possible, not on processing the information. Most students who have not learned effective study skills use this method. Even if you are skilled in some form of shorthand, you should probably also learn one of the other methods described here because they are all better at helping you process and remember the material. You may want to take notes in class using the list method, and then transcribe your notes to an outline or concept map after class as a part of your review process. It is always important to review your notes as soon as possible after class and write a summary of the class in your own words. |
||
|
Outlines |
The outline method places most important ideas along the left margin, which are numbered with roman numerals. Supporting ideas to these main concepts are indented and are noted with capital letters. Under each of these ideas, further detail can be added, designated with an Arabic number, a lowercase letter, and so forth. |
A good method to use when material presented by the instructor is well organized. Easy to use when taking notes on your computer. |
|
The advantage of the outline method is that it allows you to prioritize the material. Key ideas are written to the left of the page, subordinate ideas are then indented, and details of the subordinate ideas can be indented further. To further organize your ideas, you can use the typical outlining numbering scheme (starting with roman numerals for key ideas, moving to capital letters on the first subordinate level, Arabic numbers for the next level, and lowercase letters following.) At first you may have trouble identifying when the instructor moves from one idea to another. This takes practice and experience with each instructor, so don’t give up! In the early stages you should use your syllabus to determine what key ideas the instructor plans to present. Your reading assignments before class can also give you guidance in identifying the key ideas. If you’re using your laptop for taking notes, a basic word processing application (like Microsoft Word or Google Docs) is very effective. Format your document by selecting the outline format from the format bullets menu. Use the increase or decrease indent buttons to navigate the level of importance you want to give each item. The software will take care of the numbering for you! After class be sure to review your notes and then summarize the class in one or two short paragraphs using your own words. This summary will significantly affect your recall and will help you prepare for the next class. |
||
|
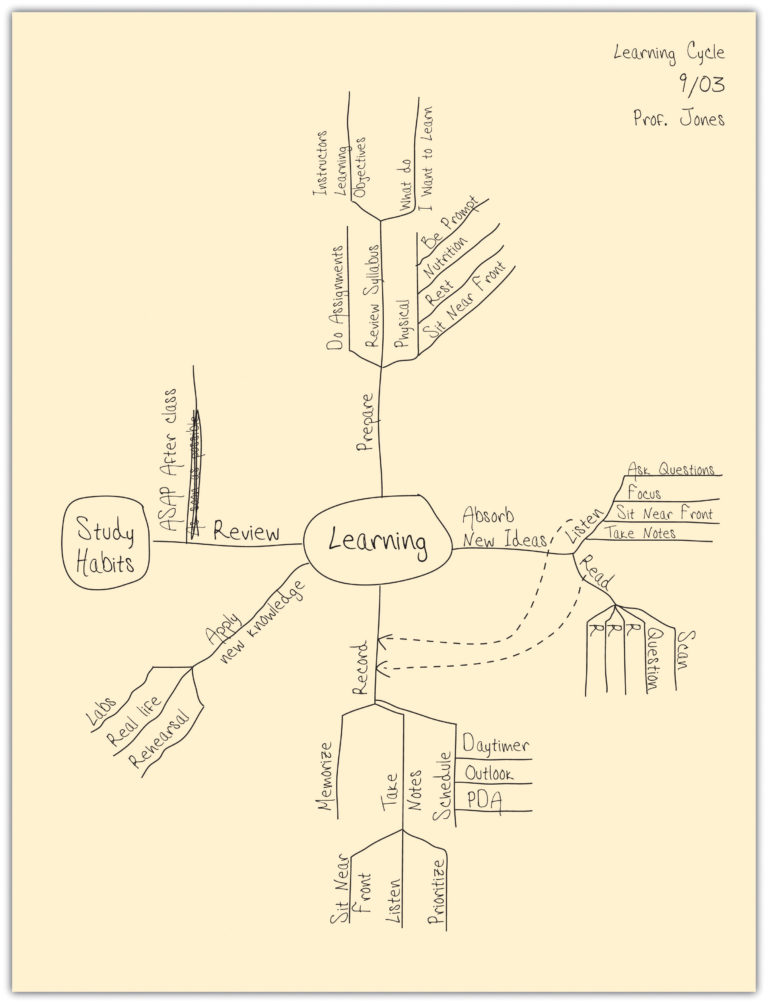
Concept Maps |
When designing a concept map, place a central idea in the center of the page and then add lines and new circles in the page for new ideas. Use arrows and lines to connect the various ideas. |
Great method to show relationships among ideas. Also good if the instructor tends to hop from one idea to another and back. |
|
Concept mapping is a very graphic method of note-taking that is especially good at capturing the relationships among ideas. Concept maps harness your visual sense to understand complex material “at a glance.” They also give you the flexibility to move from one idea to another and back easily (so they are helpful if your instructor moves freely through the material). To develop a concept map, start by using your syllabus to rank the ideas you will listen to by level of detail (from high-level or abstract ideas to detailed facts). Select an overriding idea (high level or abstract) from the instructor’s lecture and place it in a circle in the middle of the page. Then create branches off that circle to record the more detailed information, creating additional limbs as you need them. Arrange the branches with others that interrelate closely. When a new high-level idea is presented, create a new circle with its own branches. Link together related circles or concepts by using arrows and symbols to capture the relationship between ideas. For example, an arrow may be used to illustrate cause or effect, a double-pointed arrow to illustrate dependence, or a dotted arrow to illustrate impact or effect. As with all note-taking methods, you should summarize the chart in one or two paragraphs of your own words after class. |
||
|
Cornell Method |
The Cornell method uses a two-column approach. The left column takes up no more than a third of the page and is often referred to as the “cue” or “recall” column. The right column (about two-thirds of the page) is used for taking notes using any of the methods described above or a combination of them. After class or completing the reading, review your notes and write the key ideas and concepts or questions in the left column. You may also include a summary box at the bottom of the page. |
The Cornell method can include any of the methods above and provides a useful format for calling out key concepts, prioritizing ideas, and organizing review work. Most colleges recommend using some form of the Cornell method. |
|
The Cornell method was developed in the 1950s by Professor Walter Pauk at Cornell University. It is recommended by most colleges because of its usefulness and flexibility. This method is simple to use for capturing notes, is helpful for defining priorities, and is a great study tool. The Cornell method follows a very specific format that consists of four boxes: a header, two columns, and a footer. The header is a small box across the top of the page. In it you write identification information like the course name and the date of the class. Underneath the header are two columns: a narrow one on the left (no more than one-third of the page) and a wide one on the right. The wide column, called the “notes” column, takes up most of the page and is used to capture your notes using any of the methods outlined earlier. The left column, known as the “cue” or “recall” column, is used to jot down main ideas, keywords, questions, clarifications, and other notes. It should be used both during the class and when reviewing your notes after class. Finally, use the box in the footer to write a summary of the class in your own words to help you make sense of your notes in the future and serve as a valuable tool to aid with recall and studying.
|
||


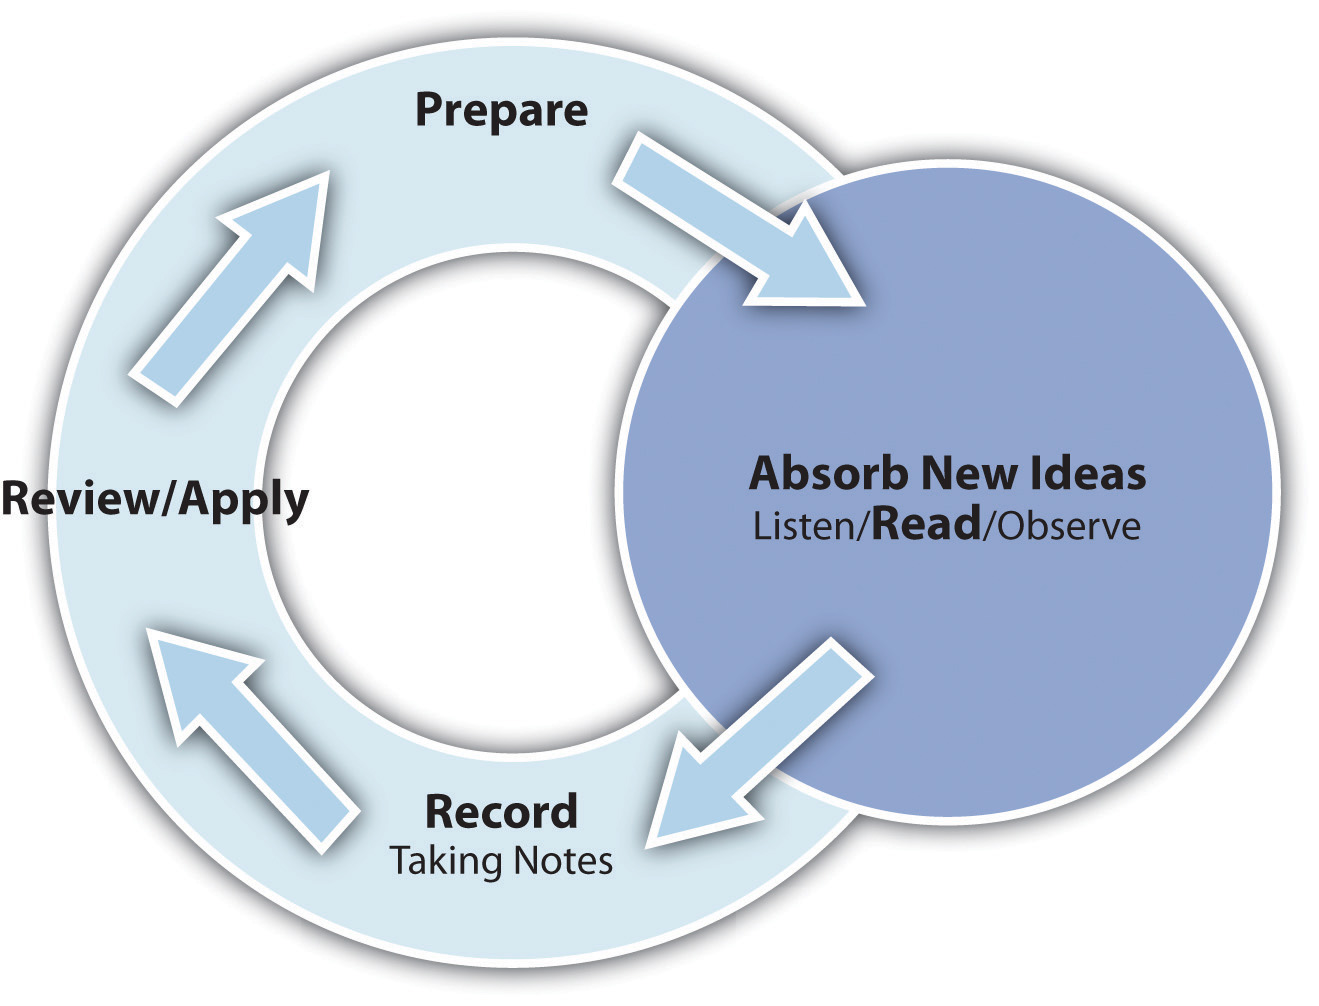
Active Reading
Effective reading requires more engagement than just reading the words on the page. In order to learn and retain what you read, it’s a good idea to do things like circling key words, writing notes, and reflecting. Actively reading academic texts can be challenging for students, but practicing the following steps can help make time spent reading more efficient and productive:
Preview: You can gain insight from an academic text before you even begin the reading assignment. For example, if you are assigned a nonfiction book, read the title, the back of the book, and the table of contents. Scanning this information can give you an initial idea of what you’ll be reading and some useful context for thinking about it. You can also start to make connections between the new reading and knowledge you already have, which is another strategy for retaining information.
Read: While you read an academic text, you should have a pen or pencil in hand. Circle or highlight key concepts. Write questions or comments in the margins or in a notebook to help you remember what you are reading and also to build a personal connection with the subject matter.
Summarize: After you read an academic text, it’s worth taking the time to write a short summary, even if your instructor doesn’t require it. The exercise of jotting down a few sentences or a short paragraph capturing the main ideas helps you understand and absorb what you read and gives you ready study and review materials for exams and writing assignments.
Review: It always helps to revisit what you’ve read for a quick refresher. It may not be practical to thoroughly reread assignments from start to finish, but before class discussions or tests, it’s a good idea to skim through them to identify the main points, reread any notes at the ends of chapters, and review any summaries you’ve written.
Dealing with Special Texts
While active reading is very useful for most assignments, you should consider some additional strategies for reading assignments in other subjects below.
Mathematics Texts
Mathematics present unique challenges in that they typically contain a great number of formulas, charts, sample problems, and exercises. Follow these guidelines:
- Do not skip over these special elements as you work through the text.
- Read the formulas and make sure you understand the meaning of all the factors.
- Substitute actual numbers for the variables and work through the formula.
- Make formulas real by applying them to real-life situations.
- Do all exercises within the assigned text to make sure you understand the material.
- Since mathematical learning builds upon prior knowledge, do not go on to the next section until you have mastered the material in the current section.
- Seek help from the instructor or teaching assistant during office hours if need be.
Reading Graphics
Textbooks contain tables, charts, maps, diagrams, illustrations, photographs, and the newest form of graphics—Internet URLs for accessing text and media material. Many students are tempted to skip over graphic material and focus only on the reading. Don’t. Take the time to read and understand your textbook’s graphics. They will increase your understanding, and because they engage different comprehension processes, they will create different kinds of memory links to help you remember the material.
To get the most out of graphic material, use your critical thinking skills and question why each illustration is present and what it means. Don’t just glance at the graphics; take time to read the title, caption, and any labeling in the illustration. In a chart, read the data labels to understand what is being shown or compared. Think about projecting the data points beyond the scope of the chart; what would happen next? Why?
|
Type of Graphics |
How are they used? |
Example |
|
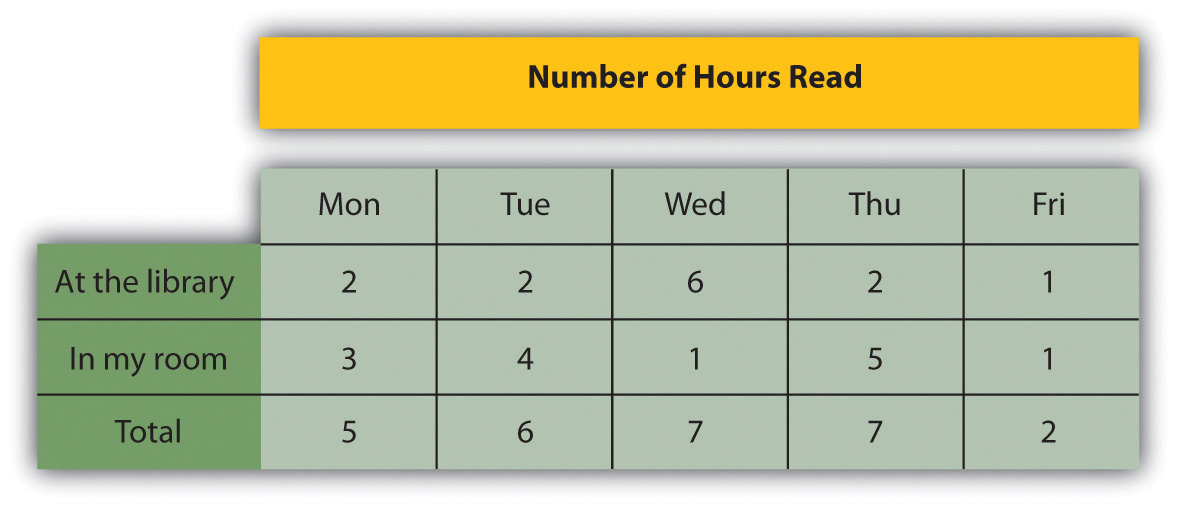
Table |
Most often used to present raw data. Understand what is being measured. What data points stand out as very high or low? Why? Ask yourself what might cause these measurements to change. |
|
|
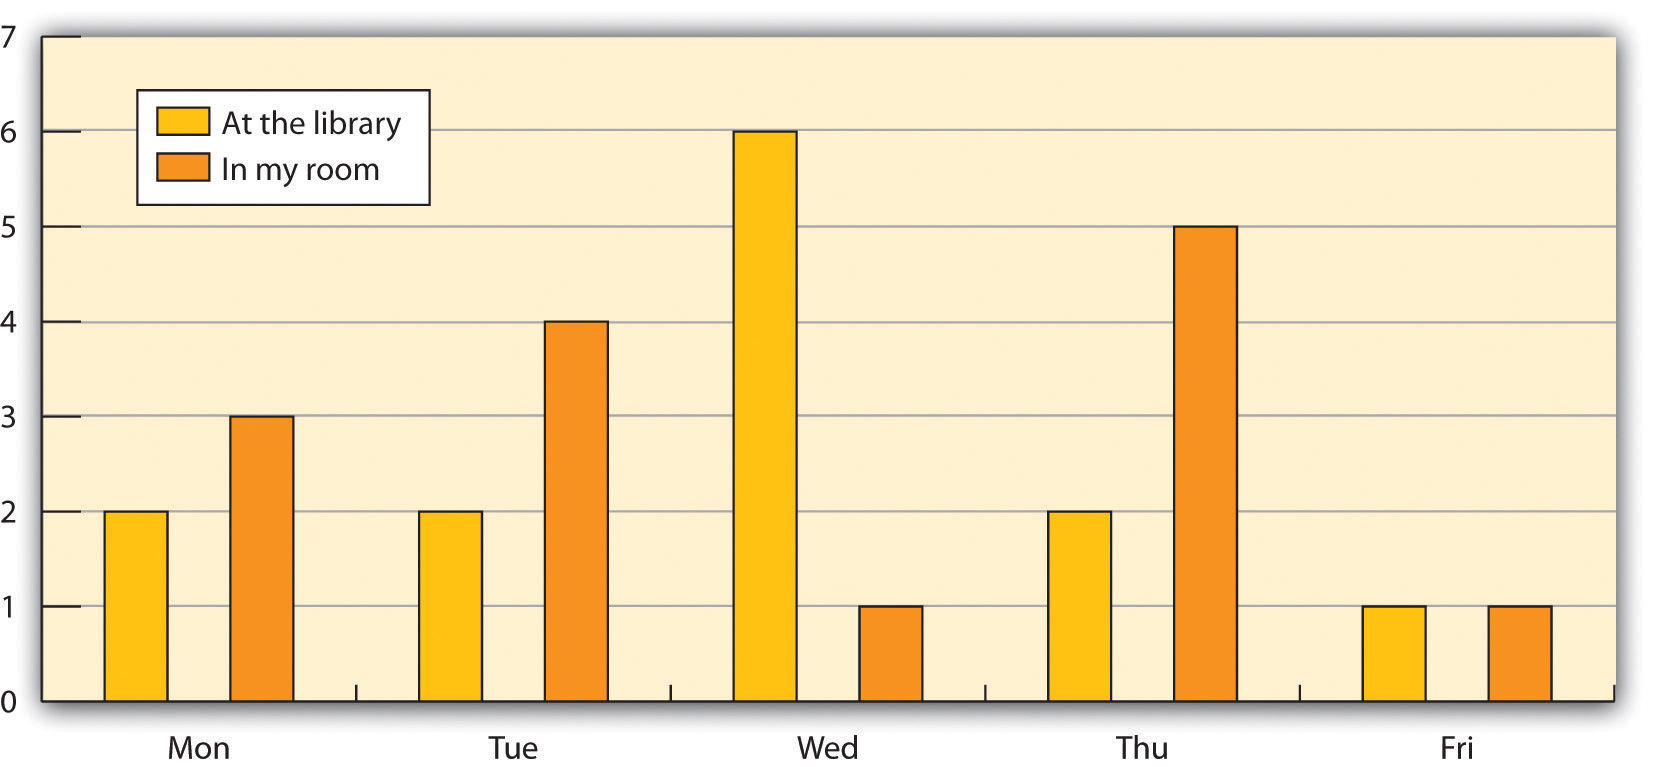
Bar Chart |
Used to compare quantitative data or show changes in data over time. Also can be used to compare a limited number of data series over time. Often an illustration of data that can also be presented in a table. |
|
|
Line Chart |
Used to illustrate a trend in a series of data. May be used to compare different series over time. |
|
|
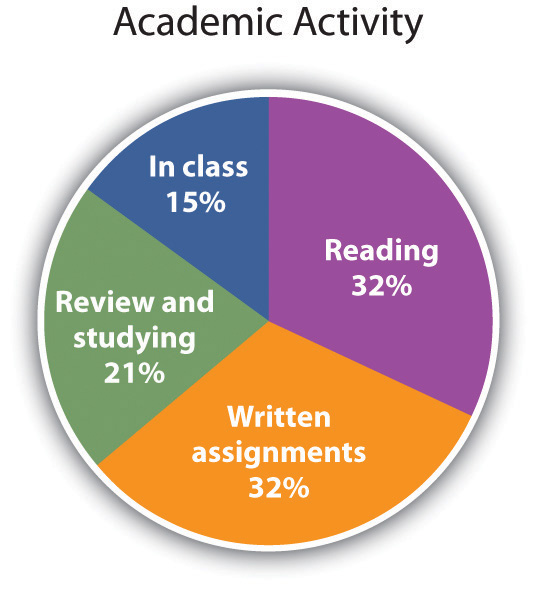
Pie Chart |
Used to illustrate the distribution or share of elements as a part of a whole. Ask yourself what effect a change in distribution of factors would have on the whole. |
|
|
Map |
Used to illustrate geographic distributions or movement across geographical space. In some cases can be used to show concentrations of populations or resources. When encountering a map, ask yourself if changes or comparisons are being illustrated. Understand how those changes or comparisons relate to the material in the text. |
|
|
Photograph |
Used to represent a person, a condition, or an idea discussed in the text. Sometimes photographs serve mainly to emphasize an important person or situation, but photographs can also be used to make a point. Ask yourself if the photograph reveals a biased point of view. |
|
|
Illustration |
Used to illustrate parts of an item. Invest time in these graphics. They are often used as parts of quizzes or exams. Look carefully at the labels. These are vocabulary words you should be able to define. |
|
|
Flowchart or Diagram |
Commonly used to illustrate processes. As you look at diagrams, ask yourself, “What happens first? What needs to happen to move to the next step?” |
|


Troubleshooting your reading
Listening
You listen to others in many situations: to interact with friends, to get instructions for a task, or to learn new material. There are two general types of listening situations: where you will be able to interact freely with the speaker (everyday conversations, small discussion classes, business meetings) and where interaction is limited (lectures and webcasts).
In interactive situations, you should apply the basic principles of active listening (see “Principles of Active Listening”). These are not hard to understand, but they are hard to implement and require practice to use them effectively.
Principles of Active Listening
- Focus on what is being said. Give the speaker your undivided attention. Clear your mind of anything else. Don’t prejudge. You want to understand what the person is saying; you don’t need to agree with it.
- Repeat what you just heard. Confirm with the speaker that what you heard is what he or she said by paraphrasing what you heard the speaker say.
- Ask the speaker to expand or clarify. If you are unsure you understand, ask questions; don’t assume.
- Look for nonverbal signals as well as the words used. Nonverbal messages come from facial expressions, body positioning, arm gestures, and tone of voice. Confirm these body language messages just as you would verbal messages by saying, for example, “You seem very excited about this idea.”
- Listen for requests. A speaker will often hide a request as a statement of a problem. If a friend says, “I hate math!” this may mean, “Can you help me figure out a solution to this problem?”
Listening in a classroom or lecture hall to learn can be challenging because you are limited by how—and how much—you can interact with an instructor during the class. The following strategies help make listening at lectures more effective and learning more fun.
Get your mind in the right space. Prepare yourself mentally to receive the information the speaker is presenting by following the previous prep questions and by doing your assignments (instructors build upon work presented earlier).
Get yourself in the right space. Sit toward the front of the room where you can make eye contact with the instructor easily. Most instructors read the body language of the students in the front rows to gauge how they are doing and if they are losing the class. Instructors also believe students who sit near the front of the room take their subject more seriously and are more willing to give them help when needed or to give them the benefit of the doubt when making a judgment call while assigning grades.
Focus on what is being said. Eliminate distractions. Turn your cell phone off and pack it away in your backpack. If you are using your laptop for notes, close all applications except the one that you use to take notes. Clear your mind and keep quiet. Listen for new ideas. Think like an investigative reporter: you don’t just want to accept what is being said passively—you want to question the material and be convinced that it makes sense.
Look for signals. Each instructor has a different way of telling you what is important. Some will repeat or paraphrase an idea; others will raise (or lower) their voices; still others will write related words on the board. Learn what signals your instructors tend to use and be on the lookout for them. When they use that tactic, the idea they are presenting needs to go in your notes and in your mind—and don’t be surprised if it appears on a test or quiz!
Listen for what is not being said. If an instructor doesn’t cover a subject, or covers it only minimally, this signals that that material is not as important as other ideas covered in greater length.
Sort the information. Decide what is important and what is not, what is clear and what is confusing, and what is new material and what is review. This mental organizing will help you remember the information, take better notes, and ask better questions.
Take notes. We covered taking notes in much greater detail earlier in this chapter. Taking notes can help recall what your instructor said and notes can help you organize your thoughts for asking questions.
Ask questions. Asking questions is one of the most important things you can do in class. Most obviously it allows you to clear up any doubts you may have about the material, but it also helps you take ownership of (and therefore remember) the material. Good questions often help instructors expand upon their ideas and make the material more relevant to students. Thinking through the material critically in order to prepare your questions helps you organize your new knowledge and sort it into mental categories that will help you remember it.
Dealing with Special Listening Challenges
Study Strategies
Myths of Studying
Transitioning to college, you may find that the study strategies used in high school or other learning environments are no longer as effective. Improvements upon existing strategies or new strategies are often required to get on the right path forward to reach your academic goals.
In order to know if the study strategies you used in high school still work in university, you have to try it – but be ready to improve and adapt the strategies to fit your new situation. You will know if the strategies need changes if you are getting too stressed or having an unbalanced study schedule.
In Chapter 3: Metacognition and Chapter 4: Time Management, you learned about different strategies to assist your learning process and manage your time. Those strategies you read and watched videos about are similar strategies for how to engage with studying. The following strategies are just a few that can help you succeed in your classes.
Using Mnemonics
Mnemonics (pronounced new-monics) are a way to remember things using reminders. Did you learn the points of the compass by remembering NEWS (north, east, west, and south)? Or the notes on the music staff as FACE or EGBDF (every good boy does fine)? These are mnemonics. When you’re first learning something and you aren’t familiar with the foundational concepts, these help you bring up the information quickly, especially for multistep processes or lists. After you’ve worked in that discipline for a while, you likely don’t need the mnemonics, but you probably won’t forget them either.
Here are some familiar mnemonics you may find useful:

Figure 6.1: Familiar Mnemonic Devices
You can certainly make up your own mnemonics, but be careful that your reminder isn’t so complex and convoluted that it is more difficult to remember than the information you were relating it to!
Practicing Concept Association
When you study, you’re going to make connections to other things—that’s a good thing! It shows a highly intelligent ability to make sense of the world when you can associate like and even somewhat unlike components. If, for instance, you were reading Martin Luther King Jr.’s “Letter from a Birmingham Jail,” and you read the line that he had been in Birmingham, you may remember a trip you took with your family last summer through Alabama and that you passed by and visited the civil rights museum in Birmingham. This may remind you of the different displays you saw and the discussions you had with your family about what had happened concerning civil rights in the 1950s ,’60s, and ’70s in the United States.
This is a good connection to make, but if your assignment is to critique the literary aspects of King’s long epistle, you need to be able to come back to the actual words of the letter and see what trends you can see in his writing and why he may have used his actual words to convey the powerful message. The connection is fine, but you can’t get lost in going down rabbit holes that may or may not be what you’re supposed to be doing at the time. Make a folder for this assignment where you can put things such as a short summary of your trip to Alabama. You may eventually include notes from this summary in your analysis. You may include something from a website that shows you information about that time period. Additionally, you could include items about Martin Luther King Jr.’s life and death and his work for civil rights. All of these elements may help you understand the significance of this one letter, but you need to be cognizant of what you’re doing at the time and remember it is not usually a good idea to just try to keep it all in your head. The best idea is to have a way to access this information easily, either electronically or in hard copy, so that if you are able to use it, you can find it easily and quickly.
Generating Idea Clusters
Like mnemonics, idea clusters are nothing more than ways to help your brain come up with ways to recall specific information by connecting it to other knowledge you already have. For example, Andrea is an avid knitter and remembers how to create complicated stitches by associating them with nursery rhymes she read as a child. A delicate stitch that requires concentration because it makes the yarn look like part of it is hiding brings to mind Red Riding Hood, and connecting it to that character helps Andrea recall the exact order of steps necessary to execute the design. You can do the same thing with song lyrics, lines from movies, or favorite stories where you draw a connection to the well-known phrase or song and the task you need to complete.
Group Studying
Study groups are a great idea—as long as they are thoughtfully managed. A study group can give you new perspectives on course material and help you fill in gaps in your notes. Discussing course content will sharpen your critical thinking related to the subject, and being part of a group to which you are accountable will help you study consistently. In a study group, you will end up “teaching” each other the material, which is the strongest way to retain new material. But remember, being in a group working together doesn’t mean there will be less work for you as an individual; your work will just be much more effective.
Picking Group Members
- Think small. Limit your study group to no more than three or four people. A larger group would limit each student’s participation and make scheduling of regular study sessions a real problem.
- Go for quality. Look for students who are doing well in the course, who ask questions, and who participate in class discussions. Don’t make friendship the primary consideration for who should be in your group. Meet up with your friends instead during “social time”—study time is all about learning.
- Look for complementary skills and learning strengths. Complementary skills make for a good study group because your weaknesses will be countered by another student’s strengths. When a subject requires a combination of various skills, strengths in each of those skills is helpful (e.g., a group with one student who is really good at physics and another at math would be perfect for an engineering technology course). Finally, a variety of learning strengths is helpful because each of us picks up differing signals and emphases from the professor that you can share with each other, so you will not likely miss important points.
- Meet regularly. When you first set up a study group, agree to a regular meeting schedule and stick to it. Moving study session times around can result in non-participation, lack of preparation, and eventually the collapse of the study group.
How to conduct a group study session
- Assign a moderator, and rotate the role of moderator or discussion leader.This helps ensure “ownership” of the group is spread equally across all members and ensures active participation and careful preparation.
- Define an agenda and objectives. Give your study sessions focus so that you don’t get sidetracked. Based on requests and comments from the group, the moderator should develop the agenda and start each session by summarizing what the group expects to cover and then keep the group to task.
- Assign follow-up work. If there is any work that needs to be done between meetings, make sure that all team members know specifically what is expected of them and agree to do the work.
Include some of the following items on your agenda:
Review and discuss class and assignment notes since your last meeting.
Discuss assigned readings.
Quiz each other on class material.
“Reteach” aspects of the material team participants are unsure of.
Brainstorm possible test questions and responses.
Review quiz and test results and correct misunderstandings.
Critique each other’s ideas for paper themes and approaches.
Define questions to ask the professor.
Handling the Test
Quiz, Test, Exam, Midterm, Final: All powerful words that can make any student’s stomach drop. It’s normal to feel stress, just as we discussed is our “Coping with Stress” assignment this semester, when met with testing. Yet, the reality is that assessments are just a part of college life and serve as a big portion of your grade for a course. Just as we have been talking about this semester, this stress and anxiety can be managed and coped with in healthy ways. Being able to cope with this situation and master test anxiety are crucial to becoming a successful college student. Doing well on exams comes down to two key parts:
- How you prepare for the test
- How you approach the test itself
Test Prep
It may sound wild, but test prep starts on the very first day of class. As soon as you receive your syllabus, look for any information about exams. Most instructors includes test dates, the number of exams, and test format on the syllabus. If this information isn’t in the syllabus, be sure to attend class regularly to get the details, which is one of the essential habits for essential test prep.
As exam day draws near, shift your focus to organizing and reviewing what you have learned. Be sure to outline key concepts, highlight important terms, and use your notes to create study guides or flashcards. The goal is to make all the materials easier for you to review and remember. If your instructor offers a review session, go! Most review sessions include vital information about what to expect on the exam. If you cannot attend a review session, be sure to get to class early on exam day to review notes and helpful information with other students.
Lastly, make sure you know what the exam format ahead of time. Multiple choice? Short response? A little bit of everything? Understanding the exam format will help you know how to study and relieve some test anxiety.
Test-Anxiety
Most of us have felt it at some point: you sit down for an exam, read the first question… and suddenly, your mind goes completely blank. It’s perfectly normal to feel some anxiety before a test. In fact, a little nervous energy can be a good thing. It helps sharpen your focus and can even boost your motivation to study.
But when it becomes overwhelming and starts to interfere with your ability to concentrate, remember what you’ve studied, or even think logically and clearly during the exam, it shifts from helpful to harmful. At that moment it is no longer nervousness, it is test anxiety that can impact your ability to show your instructor what you know.
Test Anxiety is an array of physical, psychological, and Test anxiety emotional characteristics that students may experience, either prior to test-taking or during test-taking, that hinders them from organizing clear and concise thought patterns associated with the act of examination or with a particular subject of examination (Spada, Nikcevic, Mo-neta, & Ireson, 2006).
Recognizing when your anxiety has crossed that line is the first step in mastering how to manage and cope with your anxiety. With the right tools and strategies, you can overcome this anxiety and perform your best.
How to Deal with Test Anxiety
As we have mentioned, being unable to focus and feeling overwhelmed can be signs of test anxiety. However, there are strategies we can utilize to help you regain control of the situation and overcome test anxiety.
You can always start with a few basic relaxation techniques:
Pause, and take a few sleep, deep breaths. This can help calm your nervous system and clear your mind.
Sit back and reset your focus. Remind yourself that you are prepared for the challenge in front of you and bring your attention back.
Try to ignore distractions around you. Attempt to not let noises, movements, or other students’ behavior guide your focus away from the test.
If one or more of these techniques work for you, you can then use some test-taking strategies to work through the exam:
Scan the entire exam first. Notice the types of questions included. If you prepared correctly, these should be unsurprising in the moment. However, seeing question types that were unexpected can let you plan effectively.
Start with what you know. Answer questions that come easy to you. Getting a “win” early on can help boost confidence and give you more time on harder questions.
Skip the tough ones. With this being the opposite of the last strategy, we don’t want to get stuck on a question. Make a note of the question and move on. We can return to that question when you have more time.
Keep an eye on the time. If you have a limited amount of time, then you need to pace yourself accordingly. Note the number of questions and how much time to see how long you can spend on each question.
These strategies will help you manage your anxiety and put you on a path to mastering test-taking at the collegiate level. With time and practice, you will gain more confidence and feel better equipped to face future exams.
Student Spotlight: Evie, the Therapy Dog
Evie is a labradoodle who has been working since she was two years old. She received her training and certification for pet therapy from a Kentucky non-profit organization, Pawsibilities Unleashed. Her training allows her to be in public spaces where she is invited and scheduled. Pet therapy animals provide a wide range of benefits and interventions to the populations they work with. Working on a college campus, Evie provides stress relief, unconditional positive regard, and a safe space to simply exist in the chaos of life
Summary
- Review your past tests to learn from your mistakes. Evaluate your results and consider why you got answers right or wrong; think about how you studied for this test and what you might need to change about your study habits; and finally, judge whether you managed your test-taking tasks well. Next, correct your mistakes and write out the correct answers. Finally, make your past tests part of your study notes and make adjustments to how you study or take tests to prevent making similar mistakes in the future.
- Frequent study is more effective than just studying before a test or exam. Study every day merging your class and reading notes, and creating questions for your professor on areas of confusion.
- Apply or visualize the material to make it more meaningful and cement your knowledge by testing yourself.
- Study in course units by using notes and text to create summaries or outlines of the material.
- A least a week before a major test or exam, gather what you know about what the test will cover, review your summaries and outlines and come up with likely test questions to use to test yourself. You may need to go back to review sections of notes based on expected test questions.
- Group study that is well managed can be an effective way to deepen your learning and understanding. Pick quality group members, meet regularly, assign a rotating moderator, set up an agenda and assign follow up work for group members.
- Test anxiety is a common feeling when preparing for exams in college. Just as with normal stress, there are ways to cope with test anxiety and strategies for test taking to relieve stress.
References
Spada, M., Nikcevic, A., Moneta, G., & Ireson, J. (2006). Metacognition as a mediator of the effect of test anxiety on a surface approach to studying. Educational Psychology, 26(5), 615–624.
Attributions and Licenses
Parts of this chapter are adapted from the following sources:
First Year Seminar © 2022 by Kristina Graham, Rena Grossman, Emma Handte, Christine Marks, Ian McDermott, Ellen Quish, Preethi Radhakrishnan, and Allyson Sheffield, licensed under a Creative Commons Attribution-ShareAlike 4.0 International License.
College Success © 2020 by Amy Baldwin and OpenStax, licensed under a Creative Commons Attribution License.
College Success © 2024 by Tacoma Community College, licensed under a Creative Commons Attribution-NonCommercial-ShareAlike 4.0 International License.
University Success © 2016 by University of Saskatchewan, licensed under a Creative Commons Attribution-NonCommercial-ShareAlike 4.0 International License.
